Be My Valentine Quilt Part 1
I love to sew. I started when I was 12, learning how to cross-stitch, and I did that for several years, but it wasn't until after college that I learned how to use a sewing machine. My mom (who did not enjoy sewing) explained the basics of operating a sewing machine to me and then left me to my own devices. Everything I know about sewing I've figured out by myself from reading books, following patterns and experimenting with new techniques.
What I love about the craft is that you can make beautiful and useful things that don't just get hung on a wall or sold for 25 cents at the thrift store (like a lot of cross-stitch I see 😝). I like making things that people can use and enjoy, things that are functional and pretty. That's why I really latched on to making quilts.
A quilt is the perfect combination of beauty and usefulness, form and function. The only problem with quilts is that they tend to take a long time to make. This quilt, however, is an exception--from start to finish, this project took me approximately 3 weeks! If you've made a quilt before, you know that's not a very long time for a quilting project!
The main reason this quilt was so quick to complete was its size. Finished this quilt measures approximately 40"x 40", making it ideal as a lap quilt or baby quilt. When designing a quilt, I usually consider what block(s) I want to use and then figure out the best way to put it all together; this quilt was really built around the hearts. I knew I wanted to have appliqued felt hearts all over the middle of the quilt, so I decided on piecing randomly colored squares in rows for the background of the appliques, with wide quilted bands surrounding the middle. I also knew I wanted it to have Valentine's colors since the holiday was right around the corner, so I chose reds, whites, and pinks from my fabric stash for the pieces. Here's my preliminary design (ignore the crossed out parts 😋):
To make this quilt, you need:
6 fat quarters in chosen colors
1/2 yd. of contrasting fabric (fabric A)
1 yd. of backing fabric in a contrasting color (fabric B)
1 (8-1/2" x 11") sheet of felt in chosen color
1 yd. of low-loft batting
1 spool of all-purpose thread (color does not matter)
1 spool of quilting thread in complementary color
3-1/2" square template
sewing scissors
chalk pencil (or other quilt marker)
inkpen
measuring tape
ruler
straight pins
safety pins
iron and ironing board
sewing machine (preferable, though you could piece it all by hand if you wanted--I won't judge!)
To begin, use your square template and a pen to trace nine 3-1/2" squares on the 6 differently colored fat quarters. (If you don't know what a fat quarter is, it's a 1/4 yd. of fabric already cut and packaged to sell. They often come in fun colors and are really inexpensive, making them ideal for building your fabric stash cheaply if you're just starting out.) You should have 54 squares in 6 different colors when you're done.
Pin two squares front sides together, and sew them together on your sewing machine using a 1/4" seam allowance. The placement of the colors is up to you; I decided to alternate my red and my white (light pink) squares to create a checkerboard effect. Use one of each color in each row; each row should be 6 squares long and have all 6 colors in it.
When you finish a row, it is important to iron all of your seams to produce a smooth, flat front to the quilt. Iron vertical seams flat open on both sides, like so:
Once your second row is completed, you can pin it to the first row (front sides together) and sew the two rows together into a unit, like so:
Notice that I did not piece each row exactly the same. By carefully placing my squares so that I don't have similar fabrics close to each other, I achieve a random effect. This is also why I piece each completed row to the previous one(s) once I've finished it--it gives me a better idea of what to put where in the next row to come.
Iron the quilt again at this point and as you add each new row; again, this produces a nicer finish, and it also makes it easier to match up seams exactly, which is the hallmark of a professional looking product. Iron the rows so that the seam is pointing up toward the top of the quilt, and make sure that all your horizontal seams are facing the same direction.
Continue sewing squares together into rows and each finished row to the previous ones until you have used all 54 squares. Your completed middle should look like this (with about 6 more rows added on 😉):
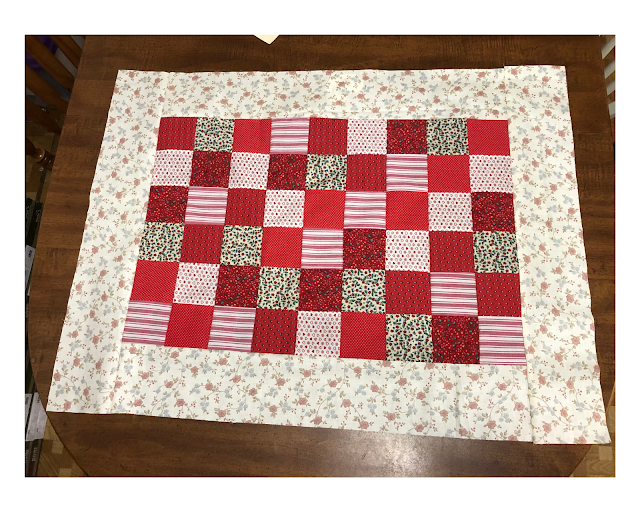
Next, take fabric A and cut four strips 4-1/2" inches wide and 27" inches long. Sew a strip to each side of the quilt, and then sew the remaining two strips to the top and bottom of the quilt. It should look like this when you're done:
Iron your quilt front one last time to make sure it is smooth and wrinkle free, and then it is time to add the applique hearts. More on that next week in part 2!


Comments
Post a Comment